|
Setting the IRQ on the MQX-32M Circuit Board
The MQX-32M's IRQ is set with dip switch S1 on the MQX-32M circuit board. Refer to the figure below for the location of S1. The IRQ is changed by moving the switches marked 5-8 on S1 to new positions for the IRQ you have selected. Locate in the following chart the IRQ you will use. Then, carefully slide switches 5-8 up or down as necessary to match the switch settings for the IRQ in the chart. Note: The D&R software will only operate on IRQ 9, so I have highlighted the correct IRQ setting. 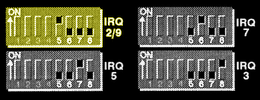 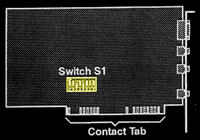
Setting the Address on the MQX-32M Circuit Board The MQX-32M's address is set with dip switch S1 on the MQX-32M circuit board. Locate S1 in the figure above. The MQX-32M's address is changed by moving the switches marked 1-4 on S1 to new positions for the address you have selected. Locate in the following chart the address you will use. Then, slide switches 1-4 up or down as needed to match switch settings for the address in the chart. Note: The D&R software will only operate with address 330h, so I have highlighted the correct address setting. 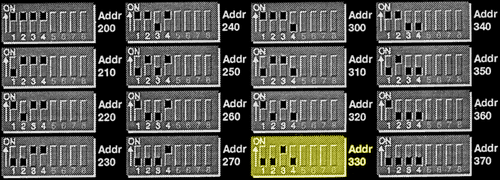
Verifying Proper MQX-32M Operation To verify proper MQX-32M operation: Download the MQX Diagnostics and run the MQDIAG program. This program must be run under DOS, not a DOS prompt under Windows. [To get to DOS click on the Start button, choose Shut Down, then "Restart the computer in MS-DOS mode"] Change to the directory where you have the mqdiag.exe file and type the command: MQDIAG /A330 /I9 This tells the program to look for the card under Address 330 and IRQ 9. Note: These are the only settings that will work with the PowerVCA software. If there are any other devices using this address or IRQ, you will be prompted with a message "No interface found". You will need to resolve the conflicting address and/or IRQ rerun the diagnostic program. Each device in your computer must have a unique address and IRQ. Once there are no conflicts you will get a message saying interface found at IRQ 9 Address 330. |
||||