Below are a few tips and tricks for tuning a moog memorymoog. The moog memorymoog Technical Service Information bulletin is a must for tuning the instrument.
[Click on each picture for a larger more detailed image.]
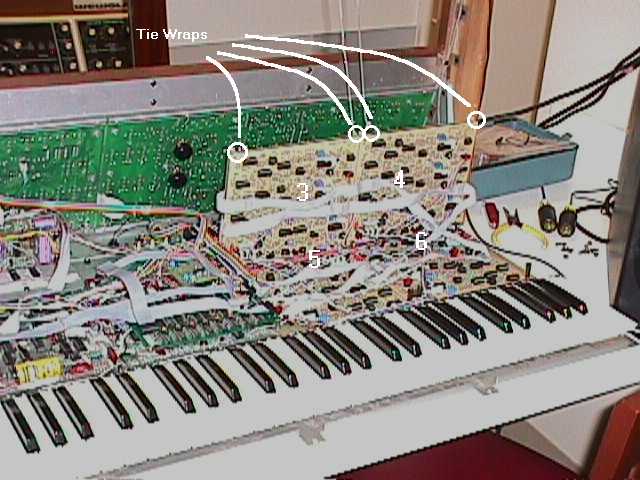 To begin, open up the memorymoog as described in the service docs and stand the top panel up on its rear edge as shown. When servicing voice cards three through six, or similarly when servicing the analog demux board, use tie-wraps to hold the boards as shown. Be sure to leave the plastic spacers in place when servicing the voice cards. Before beginning the tuning procedures outlined on page 43 of the service docs, check all power supply voltages with a high resolution digital multimeter. If any voltage rails are out more than .01V, adjust according to procedures on page 44 of the service manual. To begin, open up the memorymoog as described in the service docs and stand the top panel up on its rear edge as shown. When servicing voice cards three through six, or similarly when servicing the analog demux board, use tie-wraps to hold the boards as shown. Be sure to leave the plastic spacers in place when servicing the voice cards. Before beginning the tuning procedures outlined on page 43 of the service docs, check all power supply voltages with a high resolution digital multimeter. If any voltage rails are out more than .01V, adjust according to procedures on page 44 of the service manual.
It is impossible to use the software assisted tuning procedure without a mirror. Set up a mirror as shown and learn to read hexadecimal backwards. 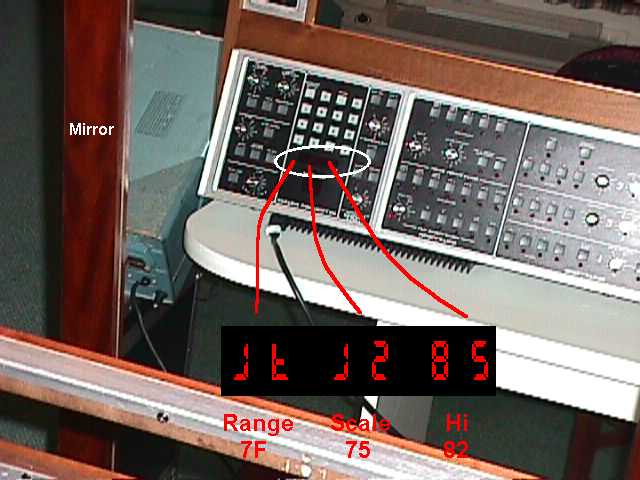 Allow at least ten minutes for the unit to warm up before proceeding. As per the service manual, enter the software tuning routine by hitting "C" "7" "Enter", then "1" "1" for voice 1 osc 1. Read the display in the mirror. You are shooting for 7F for range, scale, and hi. If scale and hi are close to the range value you can adjust the range to 7F. If the scale is out, adjust the scale until it is close or equal to the range value, then readjust the range to achieve 7F. If the hi trim is out, adjust the trim to equal range, then readjust range to 7F. All these adjustments interact to a point, so it may take several tries to get each voice tuned to the center of the capture range. Repeat these steps for oscillators 2 and 3, then voice cards 2 through 6. Allow at least ten minutes for the unit to warm up before proceeding. As per the service manual, enter the software tuning routine by hitting "C" "7" "Enter", then "1" "1" for voice 1 osc 1. Read the display in the mirror. You are shooting for 7F for range, scale, and hi. If scale and hi are close to the range value you can adjust the range to 7F. If the scale is out, adjust the scale until it is close or equal to the range value, then readjust the range to achieve 7F. If the hi trim is out, adjust the trim to equal range, then readjust range to 7F. All these adjustments interact to a point, so it may take several tries to get each voice tuned to the center of the capture range. Repeat these steps for oscillators 2 and 3, then voice cards 2 through 6.
 A really dorky picture of me working on my precious memorymoog. A really dorky picture of me working on my precious memorymoog.
|
||||